


In this article
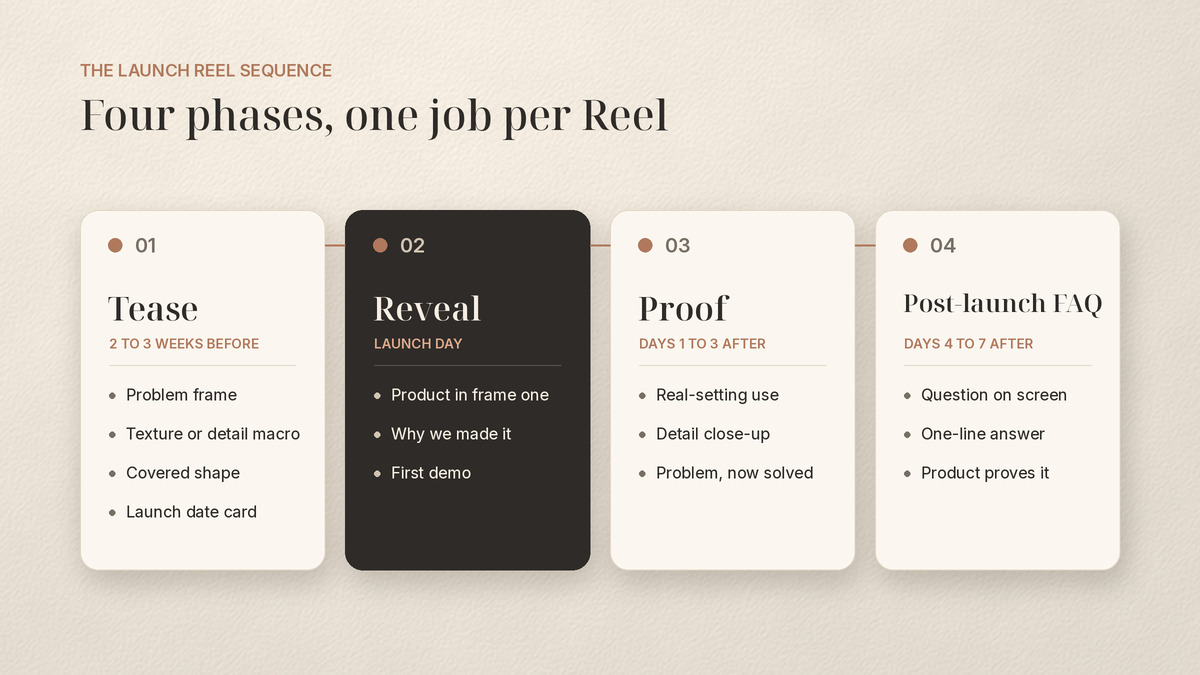
Product launch Reels work best as a sequence, not a single announcement. Run the Launch Reel Sequence in four phases: Tease (2 to 3 weeks before launch), Reveal (launch day), Proof (days 1 to 3 after), and Post-launch FAQ (days 4 to 7 after). Each phase gives every Reel one job, so attention builds before the product goes live and keeps working after it does.
Most launches on Instagram get one Reel: a polished “it’s here” video posted on launch morning. It gets a spike of likes from people who already follow you, and by day two the feed has moved on. The fix is not a bigger launch video. It is a sequence from pre-launch through the first week, where each Reel hands off to the next one.
This plan works for any new product, collection, or service tier. It is built for brand teams who film on a phone or start from product shots they already have.
The Launch Reel Sequence at a glance
Bookmark this table. It covers roughly three weeks before launch through one week after, with the Reel jobs for each phase, what to film, and one soft CTA.
| Phase | Reel jobs | What to film (3 to 5 cues) | Soft CTA |
|---|---|---|---|
| Tease (2 to 3 weeks before) | Curiosity tease, problem frame, behind the scenes, date card | 1) Macro of a texture, color, or detail with no full product 2) The everyday problem the product solves, filmed plainly 3) Hands at work: sketching, packing, testing 4) A partial silhouette or covered shape 5) Launch date on screen | Follow so you see it first |
| Reveal (launch day) | Full reveal, why we made it, first demo | 1) The full product in frame one 2) Slow 360 turn or unboxing in natural light 3) Founder or team member, one sentence on why it exists 4) The product doing its main job once 5) Where to get it | See it on our site |
| Proof (days 1 to 3 after) | Real use demo, detail close-up, before and after the problem | 1) The product in a real setting, not the studio 2) Macro of the detail that justifies it 3) The problem from your Tease Reel, now solved 4) Early customer content, only with permission 5) Size, scale, or fit next to a familiar object | Read the details |
| Post-launch FAQ (days 4 to 7 after) | One question per Reel, myth check, how to choose | 1) The real question as on-screen text, from a comment or DM 2) A team member answering in one line 3) The product showing the answer 4) A comparison card if people ask “which one” | Ask us anything in the comments |
Plan one or two Reels per phase job, not one per day. A small product launch Instagram Reels sequence might be eight Reels in total. A bigger launch might run twelve. What matters is the order, not the count.
Tease: give people a reason to care (2 to 3 weeks before)
The Tease phase builds a reason to care about something people cannot see yet. Show fragments, not the finished product. A Reel that reveals everything three weeks early has nothing left to say on launch day.
Start with the problem, not the product. The first Tease Reel can be a plain clip of the everyday frustration your product fixes, with one line of on-screen text. Your audience nods along before they know what is coming.
Then move to fragments. A macro of a new texture or color. Hands packing a box. A sketch next to a sample. A covered shape on a table. These clips read with the sound off and invite one comment: “what is it?”
In the final days before launch, add a date card. One clean frame with the launch date is enough. Avoid daily countdown Reels unless you have something new to show in each one, because the same clip with a different number does not earn a view.
A solid pre-launch Reels plan here is two to three Reels per week: one problem frame, one or two fragments, and one date card near the end.
Reveal: show the whole product in the first frame (launch day)
On launch day, the product goes in frame one. No slow build, no logo intro, no black screen. People scrolling past should know what launched before the first second ends.
Launch day Reels for brands usually need three jobs:
- The reveal. The full product, turned slowly in good light, with its name on screen. Post it first.
- Why we made it. A team member or founder, one sentence, tied back to the problem from your Tease phase. This is the Reel that makes the product feel like an answer, not just an item.
- The first demo. The product doing its main job once, start to finish. Not every feature. One job.
Post the reveal early in your audience’s day, then space the other two through launch day and the morning after. Each one should make sense on its own, because many viewers will only ever see one of them.
Here is the line worth saving: launch day is the middle of the sequence, not the end of it.
Proof: turn attention into belief (days 1 to 3 after)
Proof Reels answer the quiet question every new product raises: does it actually work, and is it as good as it looked? The Reveal earned attention. Proof earns belief.
Take the product out of the studio. Film it on a kitchen counter, in a bag, at a desk, in the setting where a buyer would really use it. Then get close: the stitch, the finish, the pour, the screen, whatever detail justifies the product.
The strongest Proof Reel closes the loop from your Tease phase. If your first Tease Reel showed the problem, show the same moment again, now solved with the product. Same angle, same setup, different outcome.
Early customer content belongs here, but only when it is real and you have permission to share it. Do not script fake reactions or write quotes for customers. If you have no customer content yet, a team member using the product honestly is better than a staged testimonial.
Many teams already have launch photography. Those stills are a fast start for detail and scale Reels, so pull them per phase and see how to turn launch product shots into Reels without starting from scratch.
Post-launch FAQ: answer what stopped people (days 4 to 7 after)
By day four, your comments and DMs hold the best brief you will get. The Post-launch FAQ phase turns the most repeated questions into short Reels, one question per Reel.
Collect every question from launch week in one list. Group repeats. The questions that show up three or more times are your first Reels. Typical ones sound like “does it work for my situation?”, “how is this different from your other one?”, or “how big is it really?”
Put the real question on screen as text in the first frame, then answer it in one line and show the product proving the answer. Keep the tone helpful, not defensive. If a question reveals a genuine limit, say so plainly. Honest answers build more trust than clever ones.
If you want ready formats for doubts about price, fit, effort, and trust, here is how to answer launch objections in Reels with simple script beats.
Do this now: build your Launch Reel Sequence by hand
You can run this checklist with a calendar, a phone, and a notes app. No tool required.
- Set the launch date and mark the phases. Count back three weeks for Tease and forward one week for Proof and FAQ. Write each phase on your calendar.
- Assign one or two Reel jobs per phase. Use the table above. Write the job in plain words, like “problem frame” or “first demo.” Need a shape to start from? Remix a proven Reels template.
- Pull or film footage per phase. Gather existing stills and clips first, then film one short batch for whatever is missing. Tease fragments and Reveal turns can usually be shot in the same session.
- Mute-check every first frame. Each Reel should make sense with the sound off. Put the product, the problem, or the question on screen.
- Give each Reel one CTA. Follow, see it, read the details, or ask a question. Never more than one.
- Log keep or kill after launch week. Note which Reels earned saves, shares, comments, and profile visits. Then answer the top questions you have not covered yet.
If you want a faster start on the formats, paste your website into beREEL. It builds Brand DNA (audience, offer type, personas, benefits, tone) and filters a TikTok-style feed of 600+ templates to your buyers, so you remix a proven format for each phase. You can make photo and video Reels from the stills and clips you already have. Creating a free account takes about a minute, and you start with 170 free credits, no card needed: www.bereel.pro.
What to keep out of the sequence
Keep the sequence about the product, not the calendar. A few habits weaken launches more than a missing Reel ever could.
- Revealing during Tease. If the full product shows up in week one, launch day has no surprise left.
- Countdown fatigue. The same clip with a new number every day trains people to scroll past.
- One Reel doing every job. A launch video that teases, reveals, demos, and answers questions in fifteen seconds lands none of them.
- Invented proof. No made-up reviews, scripted “customer” reactions, or results you cannot show.
- Stopping at launch day. Proof and FAQ Reels are where hesitant buyers decide.
If your launch date happens to land in a seasonal sale period, keep this sequence separate and see our Black Friday holiday post for that calendar. Launching a clothing drop? Pair the sequence with fashion clothing brand Reels ideas for fit and fabric shots.
Reuse the sequence for every launch
The Launch Reel Sequence is a template for your team, not a one-time campaign. Keep your phase calendar, your shot lists, and your keep-or-kill notes from this launch. For the next one, you will already know which Tease fragments got comments, which Reveal format got shared, and which questions to answer before anyone asks.
Four phases, one job per Reel, and a full week of follow-through after launch day. That is the whole plan.